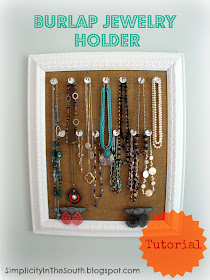
Like most women, I love jewelry! Not necessarily the designer variety. I just like variety! Nothing sets an outfit apart like a pop of color. Even a simple strand of pearls can give a basic T-shirt and jeans a bit of panache. My problem is that if I don't SEE what I have, I forget about it. Therefore,
the construction of a rustic but refined jewelry frame came to be.
the construction of a rustic but refined jewelry frame came to be.
I also have a love for burlap. For something that is meant to be so utilitarian, it is a beautiful, neutral fabric that lends its self a rustic texture that gives a nod to times gone by. When you combine the rusticity of burlap with crystal, such as in this reception party photo,
it reminds me that opposites attract and lend beauty to each object.
 |
| http://www.projectwedding.com/post/list/inspiration-crystal-and-burlap-wedding-styles |
Things you'll need:
- old frame (save the glass for your plywood measurements but subtract 1/8" for all sides)
- sandpaper, spray primer, spray paint
- 1/4" plywood
- burlap (size of plywood plus 2" on all sides)
- Mod Podge
- 13 knobs (I purchased mine here: Ebay crystal knobs
- 2 bin pulls
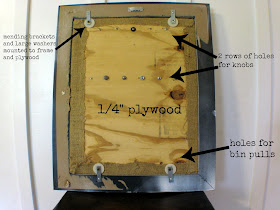
- 2" mending brackets, washers, screws (see picture below showing the back of the frame)
Instructions:
- 1.Lightly sand frame and clean with diluted vinegar (vinegar is less toxic than TSP)
- Spray frame with 1 coat of primer, let dry. Then 2 coats of spray paint. Allow to dry.
- Use the glass that you removed from the frame and trace onto the plywood. Cut the plywood 1/8" less than the tracing to allow room for your fabric.
- Predrill holes for your knob and bin pulls. My knobs are spaced 2 1/4" apart and the second row is staggered between the top row. Make sure you allow room for the frame before you determine where you want the knobs placed!
- You may need to sand any splinters off at this time.
- Coat the front of the plywood with Mod Podge.
- Center your burlap on top and coat with Mod Podge. This uses a lot of Mod Podge but it will be well protected from pulling the fabric. I tried stapling, but it just made it look wonky.
- The burlap will look white-ish, but allow it to dry and it will become transparent. Just make sure you have an even, thin topcoat. You can always add more after it dries.
- Attached the plywood to the frame with mending brackets. I had to add large washers to make up for the depth. See the picture above. The back of the frame looks rough, but no one will ever see it!
- Add your knobs.
Since I had everything for this project, except for the crystal knobs, it only cost me $13.00!
I linked this up to these awesome blogs:


Love it! I've been pinning a lot of these cute jewelry holders lately. Maybe one day I'll actually get around to actually making one!
ReplyDeleteThanks, Amy! I saw some cute ones on Etsy the other day that gave me some new ideas.
DeleteI'm so glad that I'm following you! What a clever idea. Thank you so much for sharing your beautiful work:)
ReplyDeleteKatie
www.funhomethings.com