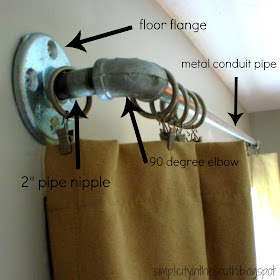
I wish I had a dollar every time someone at the home improvement store asks me, "What are planning to do with all that stuff?". What I really wish is that a had a camera the day the cashier asked me the same thing about all the plumbing parts in my cart. When I told her I was making curtain rods, all she could utter is, "oh". By the look on her face, it was not an interested "oh", but an utterly confused "oh".
I'm definitely not the first to make these, and after this tutorial, I'm hoping there will be some of you who will also tackle this DIY project.
- Galvanized floor flanges with a 1/2" opening
- Galvanized Steel Pipe Nipple 1/2" diameter x 2" long (these are threaded on both ends)
- 1/2" Galvanized 90 degree elbow
- Metal conduit pipe
- Screws
- Curtain ring clips (you'll thank me later when you have to take the curtains down to wash them)
- A handsome man (sorry, not pictured) in Home Depot or Lowes to cut the conduit. These are in very short supply ;)
First and foremost, don't have a heart attack when you see the prices of the floor flanges at the home improvement stores. They are so much cheaper through Amazon.com! I saved $5/flange this way. Here is the link. You might be able to find the parts cheaper at a plumbing supply store, but I didn't check.
First, you will need to order your 1/2" galvanized flanges from Amazon since it takes about a week for them to be shipped. Here's another money saver. Use metal conduit from the electrical section instead of galvanized plumbing pipe. The length of metal conduit should be the distance between the elbows plus a 1/2" on each side so your conduit will fit inside the elbows.
To make things easier, pre-drill your holes for the flanges and install one side of the assembled rod holders. I chose to install my flanges into the studs. Have the other rod holder assembled and slip the pipe on both sides. Have a 2nd person hold things up while you screw in the other side. This is where is helps to have a 6'1" son. Learn from my mistake...put your curtain ring clips on the pipe before you proceed to hang it! *hits palm to forehead*
For the closet rods, you can hang them this way.
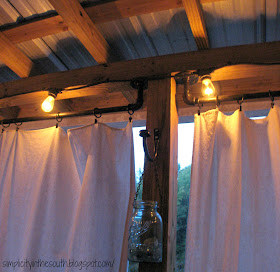
For our back porch, I used the real plumbing pipe in black that had to be threaded. They can do this for you in the store, also. Here is a close up of how it is put together.
I had to hang the rods this way because of the string lights. If you would like the link to the string lights, just leave a comment. I adore them!
This picture gives you a better idea of what I had to work around.
The galvanized flanges, elbows and nipples on the porch had to be primed and spray painted with Rust-oleum's Hammered Metal in black to match the black pipe. This also has kept it from rusting. By the way, the curtains are drop cloths and have really held up well during this summer's humidity. I've had to wash them once, so far.
Leave me a comment if you have made or are planning on making any projects from galvanized plumbing parts!
Check out the curtain rods that Maple Leaves and Sycamore Trees shared with me!
I'm linking this up to:


Thank you! These are great tips. I'm going to give it a shot! I hadn't really thought about doing the closet but I love the way that looks so I think I'll do that, too. And your outdoor ones are fab!!
ReplyDeleteGlad I could help! You'll have to let me know how it goes!
DeleteI love this! Would love to have the link for the lights! Thanks so much :)
ReplyDeleteHey, Katie! Here is the link for the string lights.
Deletehttp://www.partylights.com/Commercial/CommercialStringers-C9-plug/C9CommercialStrings-Black_3
You have to buy the sign bulbs seperately:
http://www.partylights.com/The-Insiders-Guide/Best-Sellers/11S14-Sign-Bulb-Clear
We have ours on a plug-in dimmer!
Love it! Your blog is fantastic, can't wait to follow you along the way!
ReplyDeleteThanks for following!
DeleteThese all aspects are really gorgeous and I am so excited to buying these for decorate my house; actually these particular plumbing items are long lasting. I know other viewers are also excited to buying these and I am so happy to visit here.
ReplyDeleteThank you for the compliment!
DeleteI have been wanting to remove my 1980's mirrored, sliding closet doors in my bedroom and hang curtains to "soften" the look. I saw an episode on HGTV where plumbing materials were used for this purpose. I've been too afraid to try until now.....you have inspired me! Jana in Texas
ReplyDeleteI'm glad that I could offer some inspiration! This would be perfect solution for your mirrored door dilemma. We have an 1980's home too, so I can relate!
DeleteCan you tell me what size metal conduit pipe you used? I got 1/2 inch and it won't fit in the 1/2 inch elbow. Thanks, and your son's room is awesome!
ReplyDeleteThanks! I went by Lowes this morning just to check on the sizes of the conduit. With the 1/2 inch 90 degree elbow, the 1/2 galvanized electrical conduit fit inside. Below the 5' electrical conduit, there is a label that says 1/2" EMT Conduit. But I have no clue what EMT stands for! Lol! The item number is 118909. The first time I bought the elbows, I accidentally picked one up that was a 90 degree "reduction" elbow that is 1/2" on one end and smaller on the other. The best thing to do is to take the elbows over to where the conduit is and see what fits best. It may be that your store stocks a different diameter. They also sell 5/8" conduit. Hope that helps!
DeleteOh, I forgot to mention that if you use the real plumbing pipe (which is more expensive than conduit), it will only fit inside the elbow if it is threaded. They can do that for you for free in the store. You will buy 1/2" diameter of that also.
DeleteIt's a fantastic Idea! I would love to make one for my home. Thank you so much for sharing it!!!
ReplyDeleteplumbing services australia
Its really great idea.The way of creating the blog is so attractive.You share here the most valuable information.Thanks a lot.
ReplyDeleteCurtains Melbourne
Thanks for the amazon floor flange link. It saved me about $20.
ReplyDeleteGlad I could help!
DeleteI'm DEFINITELY going to try this when I move into my new apartment. I'd like to have copper pipes though, I think to save on costs I'm going to try to find a decent copper spray paint... if you have any recommendations on a good one lemme know!!
ReplyDeleteHey Jacqueline! Hey! I've used the Rustoleum and Krylon paints, both in the Hammered Metal Finish and both in the copper. I noticed that the Krylon has a more golden tint to than the Rustoleum.
DeleteYou can make galvanized curtain rods with plumbing products with guidance from the producst here
ReplyDeleteAwesome idea! I just went out and bought all the supplies for my picture window in the living room. I won't need to cut the pipe so I will be using the whole 10-foot span. Did you need to put brackets up halfway down to support the rod or are they strong enough on their own?
ReplyDeleteHey Katie! You'll have to email me a picture when you get them up! With the conduit in Taylor's room, there is a little bit of play in the pipe if I wiggle it, but as long as the curtains are not heavy weight, you should be fine. For aesthetic reasons, it may look nicer with a center bracket. Since his curtains are open most of the time, the majority of the weight is on the outside of the rods. Hope that helps!
DeleteVery nice article. You described each and every part very well. Thanks for sharing the good news.
ReplyDeleteGreat Post.
We are from Plumb Right Plumbing Services offer best and cheap services in Texas, visit us Plumbing Services in Houston
This is absolutely brilliant, Tricia! This only shows how flexible galvanized steel is or to be specific, your galvanized metal pipes. :D You won't have a problem when it comes to the durability of this material, as galvanized metals are made to prevent corrosion and deterioration.
ReplyDeleteI have been thinking of installing pipe rods between my porch posts for a different reason. I like to hang clothes out on my west facing porch during spring, summer, & fall. I use the porch railing since it is vinyl and I use the little drying racks for smaller items. This rod could also hold many items if hung on clothes hangers. Then when they are dry, they go straight to the closet!
ReplyDelete